By Emily Parker
Updated November 2026
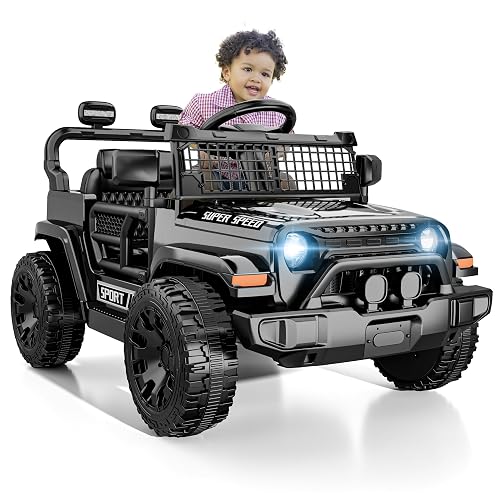
If you have been shopping for costway ride on toys, you have probably noticed how many listings look nearly identical. By the end of this guide you will know how to match a Costway model to your child’s age and size, check the specs that actually matter, and set the thing up safely in your yard or driveway. Think of it as the walkthrough I wish I had before the first box landed on my porch.
Step 1: Decide Who the Ride-On Is For
Before you compare a single listing, figure out the rider. Costway sells a wide range of battery-powered vehicles, from small single-seat cars for toddlers to larger models that work for kids well into elementary school. The most common mistake is buying for the age on the box instead of the child in front of you. A two-year-old who is tall for her age may outgrow a toddler model faster than expected, and a shy four-year-old may not be ready for a fast, high-voltage machine.
Shopping for one? See our guide: 5 Best 24v Ride On Toys for Big Yards and Long Rides: Buyer's Guide (2026).
Use these rough guidelines as a starting point:
- Ages 1 to 3: Low-speed models with a parent remote, forward-only or limited reverse, and seats with a built-in harness.
- Ages 3 to 5: Single-seat cars or tractors with a simple speed switch, usually 6V or 12V.
- Ages 5 and up: Larger 12V or 24V models with more torque, a sturdier frame and, in some cases, two-seat designs.
Always check the manufacturer’s stated age and weight range against your child. Those numbers are set for a reason, and they are the baseline for safety.
Step 2: Check the Battery Voltage and Speed
Voltage is the single biggest factor in how a ride-on performs. Higher voltage generally means more power, more hill-climbing ability and a higher top speed. It also means more risk if the vehicle is used by a child who cannot yet control it well.
| Voltage | Typical Rider Age | Terrain Suited For | Parent Involvement |
|---|---|---|---|
| 6V | 1 to 3 years | Flat patio, smooth driveway | High, often with remote |
| 12V | 3 to 6 years | Lawn, gentle slopes | Moderate |
| 24V | 6 years and up | Grass, uneven ground | Lower, but supervision still needed |
Check the listed top speed as well. Manufacturers often specify a maximum speed in miles per hour, and many Costway models ship with a low-speed setting you can use while your child learns. If the listing does not state a speed, look for a speed-limit switch on the product itself. For a deeper look at voltage tradeoffs, see Ride on Toys 12 Volt: How to Choose the Right One for Your Toddler (2026).
Step 3: Verify Weight Limits and Seat Design
Weight capacity is printed in the specs, and it matters more than most parents expect. Overloading the battery and motor shortens their life and can strain the frame. Check whether the stated limit is for the rider alone.
Next, look at the seat. A good seat should have:
- A padded backrest and seat that keep the child centered
- A seatbelt or harness, especially on models for younger riders
- Foot placement that lets a child reach the pedal or floor comfortably
- Handles or a steering wheel sized for small hands
If you are considering a two-seat model, confirm that both weight limits are met when two kids ride together. Many owners report that combined weight is where problems start.
Step 4: Assemble It Correctly
Costway ride-ons usually arrive partly assembled. Plan on roughly an hour with basic tools, and have a second adult help with wheels and seats. Work through the steps in this order:
- Lay out every part and compare it to the parts list in the manual.
- Attach the wheels first, tightening bolts evenly so the frame sits level.
- Install the seat and steering assembly, then check that the steering turns freely.
- Connect the battery using the wiring diagram. Make sure connectors click firmly.
- Fully charge the battery before the first ride, following the manufacturer’s charging time.
- Test the brake, forward and reverse before letting your child near it.
Tighten all bolts again after the first few rides. Vibration loosens hardware, and a wheel that wobbles at speed is a real hazard.
Step 5: Set Up a Safe Riding Area
Where your child rides matters as much as what they ride. Choose a flat, enclosed area without stairs, pools, steep drop-offs or traffic. A fenced yard or a closed cul-de-sac works well. Keep the path clear of toys, hoses and sprinkler heads. Avoid wet grass and gravel, which can cause skids.
For outdoor setup ideas and surface recommendations, see Best Outdoor Ride on Toys for Toddlers. If your child will ride on grass, the tire type affects traction more than most parents realize, so it is worth reading Best Rubber Tires for Ride on Toys before you buy replacements.
Step 6: Set Rules and Supervise Early Rides
Even with a parent remote or a speed limiter, supervision is non-negotiable. Plan on riding alongside your child for the first several sessions. Set simple rules: helmet on, feet inside, no riding on the street, and stop when you say stop. Practice the brake with your child until they can stop reliably without thinking.
Charge the battery after each use and store the vehicle out of direct sun and rain. Cold garages can also reduce battery performance, so bring it indoors during extreme temperatures.
Common Mistakes
- Buying a bigger model to grow into. A ride-on that is too fast or too heavy can be dangerous for a smaller child. Buy for the current size.
- Ignoring the weight limit. Adding a second child or a bag of gear can push the vehicle beyond its rating.
- Skipping the first charge. A battery that is not fully charged initially may not reach its rated life.
- Riding on slopes too early. Hills multiply speed and make braking harder. Stick to flat ground until your child is confident.
- Forgetting to check hardware. Loose bolts and worn wheels are the most common causes of mechanical trouble.
Tips for Getting the Most from Your Ride-On
- Keep a simple log of charge dates and ride time to spot battery decline early.
- Wipe down the seat and frame after wet rides to prevent rust on metal parts.
- Test the parent remote, if equipped, before every session.
- Compare Costway models against other brands in the same voltage class so you know what is typical for the price tier you are considering.
For broader comparisons across brands and ages, Top 6 Childrens Electric Ride On Toys for Toddlers and Big Kids and Ride On Toys with Parent Remote: 7 Best Picks for Toddlers (2026) are good next reads.
Recommended Gear
A few accessories make owning a Costway ride-on easier and safer.
- Bell Sports Child Helmet: A properly fitted helmet is the most important piece of gear for any ride-on rider, and a snug fit keeps it in place during quick stops. View on Amazon
- NOCO Genius Smart Battery Charger: A smart charger with automatic shutoff helps protect 12V batteries from overcharging when you are charging between rides. View on Amazon
- Ratchet and socket set: A basic metric set covers most of the bolts used during assembly and retightening. View on Amazon
FAQ
Are costway ride on toys safe for toddlers?
They can be, when you choose a model matched to the child’s age and weight and supervise every ride. Look for a low-speed setting, a harness, and a parent remote if you want extra control.
How long does the battery last on a Costway ride-on?
Runtime depends on the model, terrain, rider weight and speed. Manufacturers typically specify a run time per full charge, and owners often find that hills and heavier riders shorten it.
Do I need to charge the battery before the first ride?
Yes. Charge it fully before the first use, following the manufacturer’s time guidance, and keep it charged between sessions.
What age are costway ride on toys meant for?
Age ranges vary by model. Check the manufacturer’s listed age and weight range on the specific product before buying.
Can two kids ride one Costway vehicle?
Only if the model is designed as a two-seater and the combined weight of both riders is within the stated limit.
How do I maintain the battery?
Charge after each use, avoid letting it fully drain, store indoors in moderate temperatures, and follow the manual’s guidance on charging cycles.
Should I consult a professional about electrical issues?
Yes. If you notice burning smells, overheating, sparking or a battery that swells, stop using the vehicle and consult a qualified technician or the manufacturer before continuing.
Conclusion
Choosing among costway ride on toys comes down to matching voltage, speed and seat design to your child’s age and size, then assembling and maintaining the vehicle carefully. Check the weight limit, set up a flat and enclosed riding area, and supervise early sessions closely. Do those things and your child gets a safe, fun vehicle that will get a lot of use in the yard.
Ready to choose one?
About Emily Parker
Emily Parker is part of our editorial team and reviews and edits our dad-focused parenting guides, checking product details against manufacturer specifications and owner feedback.